Conditional Formatting in Google Docs (2025 Guide)
In this article, we will learn how to use conditional formatting in Google Docs through manual formatting. Simply follow the steps below.
Conditional Formatting in Google Docs
Google Docs does not have built-in conditional formatting in the same way Google Sheets does. However, you can achieve similar effects using manual formatting techniques. Follow the steps below to do this.
1. Use the Find Feature
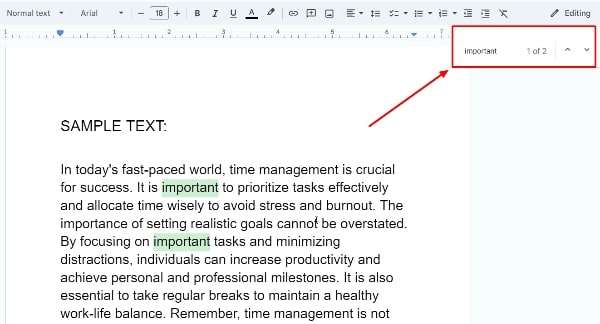
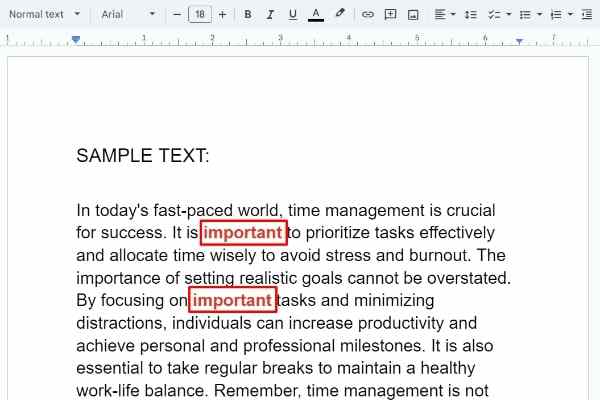
Let’s say you want to highlight all instances of the word “Important” in the sample text in red and bold. Press Ctrl + F (on Windows) or Command + F (on Mac) on your keyboard. In the Find field that will appear, enter the word “Important.”
2. Apply Formatting
You can apply bold, italics, or underline formatting to the selected text. You can also change the text or background color. These options are available in the toolbar. For this example, we will apply bold formatting and change the text color to red.

3. Repeat for Each Instance
Repeat Step 2 for each instance of the word “Important” in your document.
4. Use Find and Replace for Quick Formatting (optional)
Press Ctrl + H (on Windows) or Command + Shift + H (on Mac) to open the Find and Replace dialog box. In the Find field, enter the word “Important.” In the Replace with field, enter your replacement text. Then on Replace all to apply the changes throughout the document.
Remember: You will need to manually apply the formatting here, but since conditional formatting in Google Docs is not direct, it might not fully support all types of formatting changes.

We hope that you now have a better understanding of how to use conditional formatting in Google Docs. If you enjoyed this article, you might also like our article on how to change the background on Google Docs to a picture and how to keep formatting in Google Docs.