Google Docs Word Wrap: The Ultimate Guide for 2025
In this article, we will show you how to enable word wrap in Google Docs in just a few simple steps. Simply follow the steps below.

Word Wrap in Google Docs
Follow the steps below to enable word wrap in Google Docs.
1. Access the Drawing Tool to Add Text
Navigate to “Insert” from the top menu, select “Drawing,” then click on “New.” This will open a blank canvas within a pop-up window, where you can create and manipulate text or graphics.

2. Add and Customize Text in the Drawing Interface
In the drawing interface, click on the text box icon (represented by a “T” symbol) to add a text box.

Click anywhere on the canvas to place it, then type the text you want to wrap into the box. In our example, we will type the words “Annual Community Event Plan.”

3. Save the Drawing and Insert It into Your Document
After customizing your text, click the “Save and Close” button at the top right of the drawing interface.

This action inserts the drawing with your text into the Google Docs document.

4. Choose How Text Will Wrap Around the Drawing
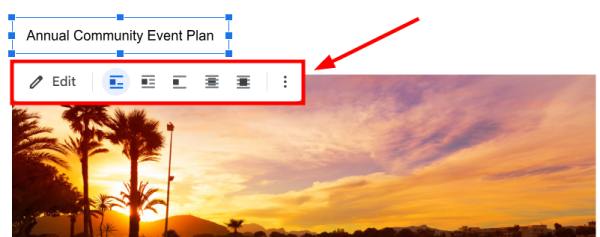
Select the drawing by clicking on it once it’s inserted into your document. This selection will bring up a small toolbar around the image.

Click on the “Wrap text” button in this toolbar to allow the text to flow around the graphic element.

You can also choose from options like “In front of text” or “Behind text” to decide how your text wraps around the drawing.

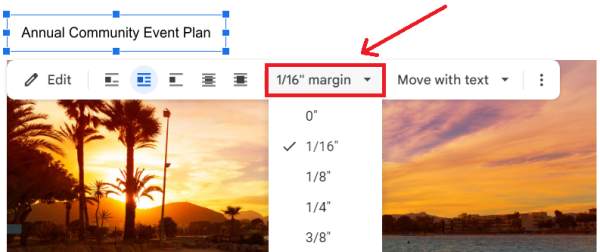
Additionally, you can adjust the margin sizes by clicking on the margin dropdown menu, which allows you to select different spacing options like 0″, 1/16″, 1/8″, 1/4″, or 3/8″. These margin settings control the spacing between your text and the drawing.

We hope that you now have a better understanding of how to enable the word wrap feature on Google Docs. If you enjoyed this article, you might also like our article on how to include footnotes in the word count on Google Docs or our article on how to cross out a word in Google Docs.


